Androidアプリ入門 No.28 DatePickerDialog
DatePickerDialog
DatePickerDialogの基本
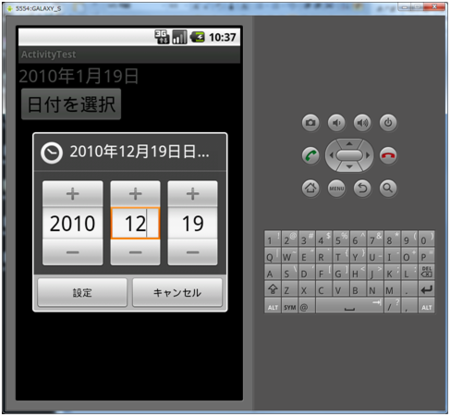
日付を選択するには、DatePickerDialogを使用するのが便利である。ActivityにはそもそもDialogを表示するメソッドがありそれを使ってDialogを表示する。
まずは、main.xmlを以下に示す。
<?xml version="1.0" encoding="utf-8"?>
<LinearLayout xmlns:android="http://schemas.android.com/apk/res/android"
    android:layout_width="wrap_content"
    android:layout_height="wrap_content"
    android:orientation="vertical">
    <TextView
        android:id="@+id/textView"
        android:layout_width="wrap_content"
        android:layout_height="wrap_content"
        android:textSize="26sp"
        android:text=""
        />
    <Button
        android:id="@+id/button"
        android:layout_width="wrap_content"
        android:layout_height="wrap_content"
        android:textSize="26sp"
        android:text="日付を選択"
        />
</LinearLayout>
次に、MainActivity.javaを示す。ほぼ、ドキュメントのままのコードとなっている。
package sample.at;

import java.util.Calendar;

import android.app.Activity;
import android.app.DatePickerDialog;
import android.app.Dialog;
import android.app.DatePickerDialog.OnDateSetListener;
import android.os.Bundle;
import android.view.View;
import android.view.View.OnClickListener;
import android.widget.Button;
import android.widget.DatePicker;
import android.widget.TextView;

public class MainActivity extends Activity {
    private TextView textView;
    private Button button;
    private int year;
    private int month;
    private int day;

    private static final int DATE_DIALOG_ID = 0;

    @Override
    public void onCreate(Bundle savedInstanceState) {
        super.onCreate(savedInstanceState);
        setContentView(R.layout.main);

        textView = (TextView) findViewById(R.id.textView);
        button = (Button) findViewById(R.id.button);

        button.setOnClickListener(new OnClickListener() {
            public void onClick(View v) {
                showDialog(DATE_DIALOG_ID);
            }
        });

        Calendar c = Calendar.getInstance();
        year = c.get(Calendar.YEAR);
        month = c.get(Calendar.MONTH);
        day = c.get(Calendar.DAY_OF_MONTH);

        updateDisplay();
    }

    private void updateDisplay() {
        textView.setText(new StringBuilder().append(year).append("年")
                .append(month + 1).append("月").append(day).append("日"));
    }

    @Override
    protected Dialog onCreateDialog(int id) {
        switch (id) {
        case DATE_DIALOG_ID:
            return new DatePickerDialog(this, dateSetListener, year, month, day);
        }
        return null;
    }

    private OnDateSetListener dateSetListener = new OnDateSetListener() {
        @Override
        public void onDateSet(DatePicker view, int selectYear, int monthOfYear,
                int dayOfMonth) {
            year = selectYear;
            month = monthOfYear;
            day = dayOfMonth;
            updateDisplay();
        }
    };
}
まず、ダイアログの表示は以下のメソッドを用いる。
public final boolean showDialog (int id);
引数が複数あるものもあるが、ここでは1つのもののみ解説する。
| 引数 | 説明 |
|---|---|
| id | 表示するダイアログのid。 |
Activity#showDialogメソッドが呼ばれると、Activity#onCreateDialogメソッドが呼び出される。onCreateDialogは以下のような定義となっている。
protected Dialog onCreateDialog (int id);
showDialogと異なりこちらはオーバーライドして実装する。引数のidにはshowDialogと同じidが渡される。idを確認し、表示するダイアログを決定する。今回は、DatePickerDialogという組み込みのダイアログを表示している。DatePickerDialogのコンストラクタは以下のような定義となっている。
public DatePickerDialog (Context context,
    DatePickerDialog.OnDateSetListener callBack,
    int year, int monthOfYear, int dayOfMonth);
引数は以下。
| 引数 | 説明 |
|---|---|
| context | 親のコンテキスト。 |
| callBack | 日付を設定したことを通知するリスナー。 |
| year | ダイアログの年の初期値。 |
| monthOfYear | ダイアログの月の初期値。 |
| dayOfMonth | ダイアログの日の初期値。 |
表示したダイアログを選択した場合、上記のとおりOnDateSetListenerでイベントを受け取る。ダイアログで「設定」ボタンが押された時にはOnDateSetListenerのonDateSetメソッドが呼び出される。メソッドの定義は以下の通り。
public abstract void onDateSet (DatePicker view, int year, int monthOfYear,
    int dayOfMonth);
引数は以下。
| 引数 | 説明 |
|---|---|
| view | ダイアログのView。 |
| year | ダイアログで設定された年。 |
| monthOfYear | ダイアログで設定された月。 |
| dayOfMonth | ダイアログで設定された日。 |
